
Written by Giovanni
Edited on
10 July 2025
·
07:47
How do you solve microphone problems with your Razer headset?
Doesn't your PC detect your Razer gaming headset? You can solve that by adjusting the privacy settings for the microphone in Windows. We'll explain how to solve problems with your Razer headset microphone here.

Solve set up problems with your Razer headset
Make sure the Razer Synapse gaming software is up-to-date. Follow the steps below to solve the setup problems of your headset.
Step 1. Install Razer Synapse
Step 2. Update the software
Step 3. Turn off microphone enhancement
Step 4. Adjust the privacy settings
Step 5. Set the Windows settings correctly
Step 6. Set the correct sound format
Step 1: install Razer Synapse
Download the Razer Synapse gaming software first. Go to the link below and click 'Download now' to download Razer Synapse 3. Go through the Synapse installation process. Reboot the PC once you've installed Razer Synapse.
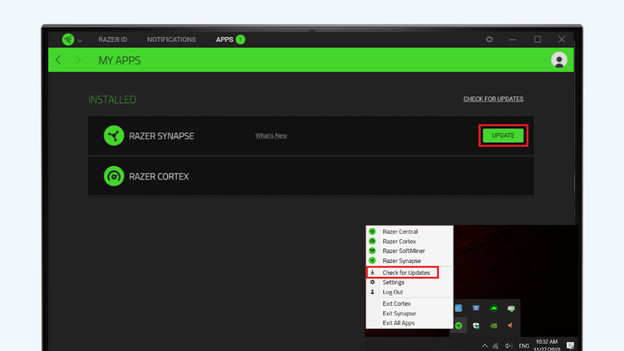
Step 2: update the software
Open Razer Synapse. Check and install the latest update. You can do this as follows:
- Click the up arrow, at the bottom right of the taskbar.
- Right-click the Razer Synapse logo.
- Click the button to check for updates.
- If a new update is available, click 'Update'.
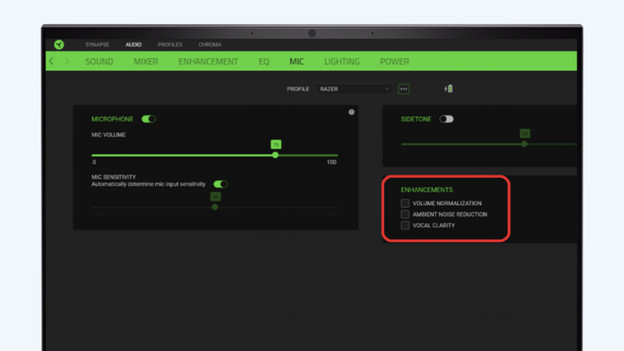
Step 3: turn off microphone enhancement
Open Razer Synapse and go to the 'Audio' tab. Click 'Mic'. Uncheck all boxes under 'Enhancements'.
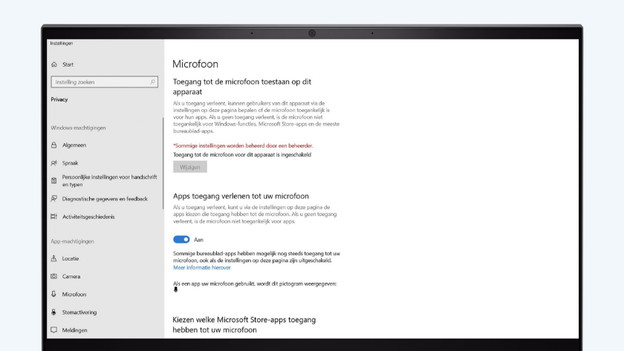
Step 4: adjust the privacy settings
Start with turning on your Razer headset, and wait for it to connect to your PC. On the desktop, you can click the magnifying glass in the bottom left. Type 'microphone privacy settings' in the bar, and click the option with the same name. Click the slider, so it's set to 'On'.
Step 5: set all the Windows settings correctly
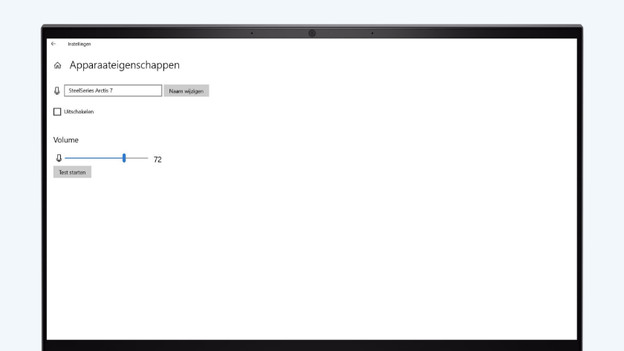
Go to the desktop of your PC and click the magnifying glass in the bottom left. Type 'Sound settings' and click the option that appears with the same name. Below 'Input', choose the right input device. That's the Razer headset. Click 'Device properties'. Slide the bar below 'Volume' all the way to the right, until it indicates 100%.
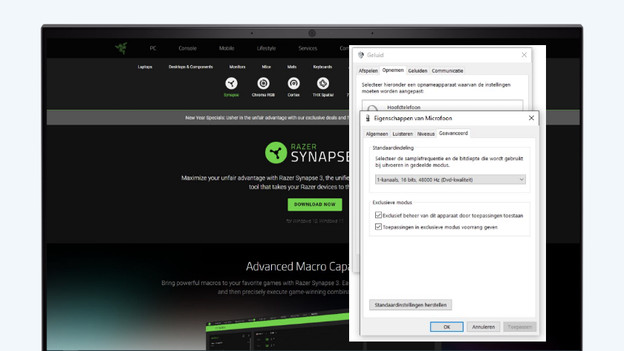
Step 6: set the correct sound format
In this 'Device properties' window, click 'Additional device properties'. Go to the 'Advanced' tab. Below 'Default format', select the option with 48,000Hz. Your Razer headset microphone is now ready for use, and your microphone works correctly.
Article by Giovanni
Gaming Expert.
